Showing posts with label fruit. Show all posts
, , , , , ,

♥ Honey Toast Box ♥


Sometimes called the brick toast, honey toast box is a dessert originated from Taiwan, which is found commonly at Taiwanese cafe and also Japanese cafe.


They are usually composed of thick cut toast with spread of butter and honey, top with sweet ornaments such as ice cream, whipped cream, fruits or even chocolate sticks.


Let's make a healthy homemade version. I have use salted butter and honey, because I like the sweet and salt combination; fresh strawberries and blueberries, but feel free to use blackberries; and completes with a scoop of delicious cookies & cream ice cream.

This post is linked to Cook and Celebrate: Chinese New Year 2016 organised by Yen from GoodyFoodies Diana from Domestic Goddess Wannabe and Zoe from Bake for Happy Kids.

This post is part of the monthly link up party Our Growing Edge. This event aims to connect food bloggers and inspire us to try new things. This month is hosted by Chinelo at Good Cake Day.

This post is part of the weekly linky party I'm Lovin' It hosted by Cheryl at TidyMom.

Serve 4
You'll need:
4 slices of thick cut toast
1/4 cup salted butter, melted
1/4 cup honey
Berries of your choice
1 scoop of your favourite ice cream
Sweetened condensed milk, to serve

How to make honey toast box:
  1. Preheat oven to 180C. Line a baking sheet with aluminum foil. Set aside.
  2. Leave one slice of bread whole. Slice off the middle of the rest of the bread to get a total of 3 squares, leaving about 1/4 inch around the edges. Cut them into bread cubes.
  3. Melt butter in microwave. Brush the crusts and bread cube deliberately with melted butter and honey. Place them on prepared baking sheet and bake for 20 minutes, or until crisp and golden brown.
  4. Meanwhile, rinse and drain the berries.
  5.  To assemble, transfer the uncut toast on the bottom. Place the crust on top following one another. Fill the inside with mini bread cubes and top with ice cream, decorate with berries and drizzle with sweetened condensed milk.
With all my love <3

Share:
Read More
, , , ,

♥ Strawberry Matcha Pound Cake Shortcake ♥


I always think matcha or green tea and strawberry is a seamless blend of dessert art.
The colour tone catches the eye and the taste of combination is deliciously notable.


This strawberry shortcake has the ordinary butter biscuit replaced by a matcha pound cake recipe. This twist is actually inspired by my Matcha Strawberry Mini Bundt Cake, which also uses Natvia as the natural sweetener.


I like how the slight bitterness from Natvia has been covered by the pronounce matcha flavor, whilst it is pretty crucial to use good quality matcha powder like this. So make sure you're not using green tea granules! 

This post is linked to Cook and Celebrate: Chinese New Year 2016 organised by Yen from GoodyFoodies Diana from Domestic Goddess Wannabe and Zoe from Bake for Happy Kids.

This blog hop is organised by Joyce from Kitchen Flavours, Lena, from Frozen wings and Zoe from Bake for Happy Kids.

This post is part of the weekly linky party I'm Lovin' It hosted by Cheryl at TidyMom.

This post is part of the monthly link up party Our Growing Edge. This event aims to connect food bloggers and inspire us to try new things. This month is hosted by Jess at Little Girl Story.

You'll need:
For matcha pound cake
1/2 cup butter, soften
2/3 cup Natvia
2 eggs
1 tsp vanilla
1 tbsp whole milk
1 cup all purpose flour
1 tbsp matcha powder

For toppings
1 1/2 cup whipping cream
1 tsp vanilla
Fresh strawberries, halved

How to make matcha green tea pound cake:
  1. Preheat oven to 180C. Grease a loaf pan and set aside.
  2. In a mixing bowl, combine butter and Natvia. Cream until smooth.
  3. Add egg, one at a time, and beat until well incoprated. Add vanilla.
  4. In a small bowl, sift together flour and matcha powder. Add the dry into the wet ingredients and mix well.
  5. Pour batter into prepared loaf tin. Bake for 40-45 minutes or until set and edges slightly turned brown.
  6. Meanwhile, add vanilla into cold whipping cream and beat until soft peak formed.
  7. Serve one to two slices of matcha pound cake with a dollop of vanilla whipped cream and fresh strawberries.
With all my love <3

Share:
Read More
, , ,

♥ Ginger Persimmon Crisp ♥


Persimmon is one of my mom's favourite fruits. No matter it was fresh or dried, she could generously finish three in a row.


The fact that persimmon is low in calories and fats. it is a great choice to make some fruit base desserts. Of course, a brown betty is the easiest one.


While both crumbles and crips are considered as fresh fruits with streusel-like topping, they are different as in crisps contain oats but crumble do not.
In the recipe, the freshly grated ginger has added phenomenal flavors to the dish that is certainly not substitutable by ground ginger powder.  


This post is linked to Cook and Celebrate: Christmas 2015 organised by Yen from GoodyFoodies Diana from Domestic Goddess Wannabe and Zoe from Bake for Happy Kids.

This post is part of the weekly linky party I'm Lovin' It hosted by Cheryl at TidyMom.

This post is part of the monthly link up party Our Growing Edge. This event aims to connect food bloggers and inspire us to try new things. This month is hosted by Jazz at Dash of Jazz.

Adapted from Keep In It Kind
You'll need:
For fillings:
2 persimmon, peeled and sliced into half moons
40g (3 tbsp) freshly grated ginger
1 tbsp Natvia
1/4 tsp lemon juice
1/3 tbsp cornstarch
1/2 tsp lemon zest

For toppings:
30g (1/4 cup) all purpose flour
30g (1/4 cup) corn flour
50g (1/4 cup) Natvia
1/2 tsp ground cinnamon
1/2 tsp ground ginger
1/8 tsp salt
45g (3 tbsp) unsalted butter
15g (1/6 cup) old fashion rolled oats

How to make ginger persimmon crisp:
  1. Preheat oven to 200 C. Spray or butter a baking tray and set aside.
  2. Place persimmon slices in a large bowl. Add grated ginger, Natvia, lemon juice, cornstarch and lemon zest. Toss well and transfer to baking dish.
  3. To make the topping, combine oat flour, corn flour, Natvia, cinnamon and salt. Cut in chunks of butter until the mixture is crumbly. Add in rolled oats and spread evenly over the persimmon.
  4. Bake in preheated oven for 30 minutes or until bubbly and topping turns golden brown.
  5. Remove from oven and let cool for 30 minutes before serving.
  6. Top with whipped cream or vanilla ice cream. Store leftovers in refrigerator and reheat before serving.
With all my love <3

Share:
Read More
, ,

♥ Jam Tartlets ♥


Jam tartlets have been on my to-make-list for long. I really like the combination of fruity jams with buttery crust, especially when the jam appears gluey sticky after baking. You know what I mean!


So often I am afraid of making the tart base because I don't have the patience to perfect them.


But look at the rim! They look perfect! ALMOST!


This recipe uses a pastry crust known as pate sucree. Which is similar to pastry dough, but further enriched with egg yolk and sugar. I find this makes the perfect crust not only because it has less sugar, but the yolk also makes the dough pliable and easier to handle.

This post is part of the weekly linky party I'm Lovin' It hosted by Cheryl at TidyMom.

This post is also linked to the event, Little Thumbs up organised by Doreen from my little favourite DIY and Zoe from Bake for Happy Kids, hosted by Grace from Life can be simple at this post.

You'll need:
For the pate sucree
1 1/4 cup all purpose flour
3 tbsps Natvia
1/2 cup (1 stick) cold salted butter
1 egg yolk
1 tbsp ice water

For the fillings and toppings
Your favourite jams
1/2 cup heavy whipping cream
1/2 tbsp powdered sugar
1/4 tsp vanilla

How to make jam tartlets:
  1. To make the pate sucree: In a bowl combine flour and Natvia. Cut butter cubes using a fork or pastry blender until dough resembles coarse crumbs. Beat egg yolk and water. Slowly add to the flour mixture until a dough comes together. You may not need all the liquid. Turn the dough onto a floured surface and roll into a disk. Wrap in plastic and refrigerate for at least 30 minutes. This pate sucree dough can be stored in the freezer for 2 months.
  2. Preheat oven to 200C. Remove the dough onto a floured surface, roll into best fit circles to the tart tins. Remove any excess from the rim.
  3. Using a star shaped cookie cutter, cut out little stars from the dough scraps.
  4. Fill each tart with jams. Transfer tins and starts onto a baking sheet lined with parchment paper. Bake in preheated oven for 15 minutes. Remove the stars when they turn golden brown. Continue to bake the tarts for another 20 minutes, or until set and edges turn golden brown.
  5. Allow the tart to cool complete. Meanwhile, combine heavy cream, powdered sugar and vanilla. Whip until stiff peaks form.
  6. To serve, dollop with sweetened whipped cream and top with star cookie.
With all my love <3

Share:
Read More
, ,

♥ Lemon Meringue Tart ♥


Homemade lemon curd for my homemade lemon meringue tart! Invest in good lemon because it will solely change the flavor of your lemon curd.


The tanginess from the lemon , sweetness from the natural honey, and butteriness from the shortcrust. This tart is made to heaven!


Can you imagine how long it took me to whip up the glossy meringue?


In this recipe, I am using Archibald's honey from Honey 蜜蜜針! Check out more at their FaceBook Page! Or you may want to replace it with sugar and adjust the level of sweetness.
This post is part of the weekly linky party I'm Lovin' It hosted by Cheryl at TidyMom.

You'll need:
Adapted from beanpanda
For lemon curd:
1 egg
80ml lemon juice (approximately 2 lemons)
zest of 1 lemon
50g Honey
60g cold butter
2 tbsp ice water

For crust:
1 shortcrust pastry

For meringue topping:
Adapted from Martha Stewart
2 egg whites
pinch of cream of tartar
1/2 cup granulated sugar
1/4 tsp vanilla

How to make lemon curd:
  1. To make lemon curd, combine egg, lemon juice, lemon zest and honey in a bowl. Heat the mixture over a double boiler. Whisk constantly until thicken, this takes around 10-12 minutes.
  2. Remove the bowl from heat, add in cold butter and whisk to smooth. Pour over a fine sieve to remove lumps and keep in an airtight container for up to 2 weeks.
How to make meringue topping:
  1. Whisk egg whites and cream of tartar on medium speed until foamy. Gradually add granulated sugar and whisk until glossy and stiff peaks formed. Whisk in vanilla until just combined.
How to make lemon meringue pie:
  1. Preheat oven to 200C. Remove the dough and roll onto a floured surface. Using a round biscuit cutter, cut out small circles and fit in tart tin. Trim the edges and place in the fridge to chill. Fill chilled tart shells with pie weight and bake for 15 minutes.
  2. Remove pie weight and bake for another 15 minutes, until golden brown. Carefully remove the tart shell and cool completely. 
  3. Fill tart shells with lemon curd. Pipe meringue topping and chill in the freezer until ready to serve.
  4. When serve, use a kitchen torch to toast the meringue. Alternatively, place under preheated broiler for 2 minutes to brown.
With all my love <3

Share:
Read More
, , ,

♥ Lychee Raspberry Rough Tart ♥


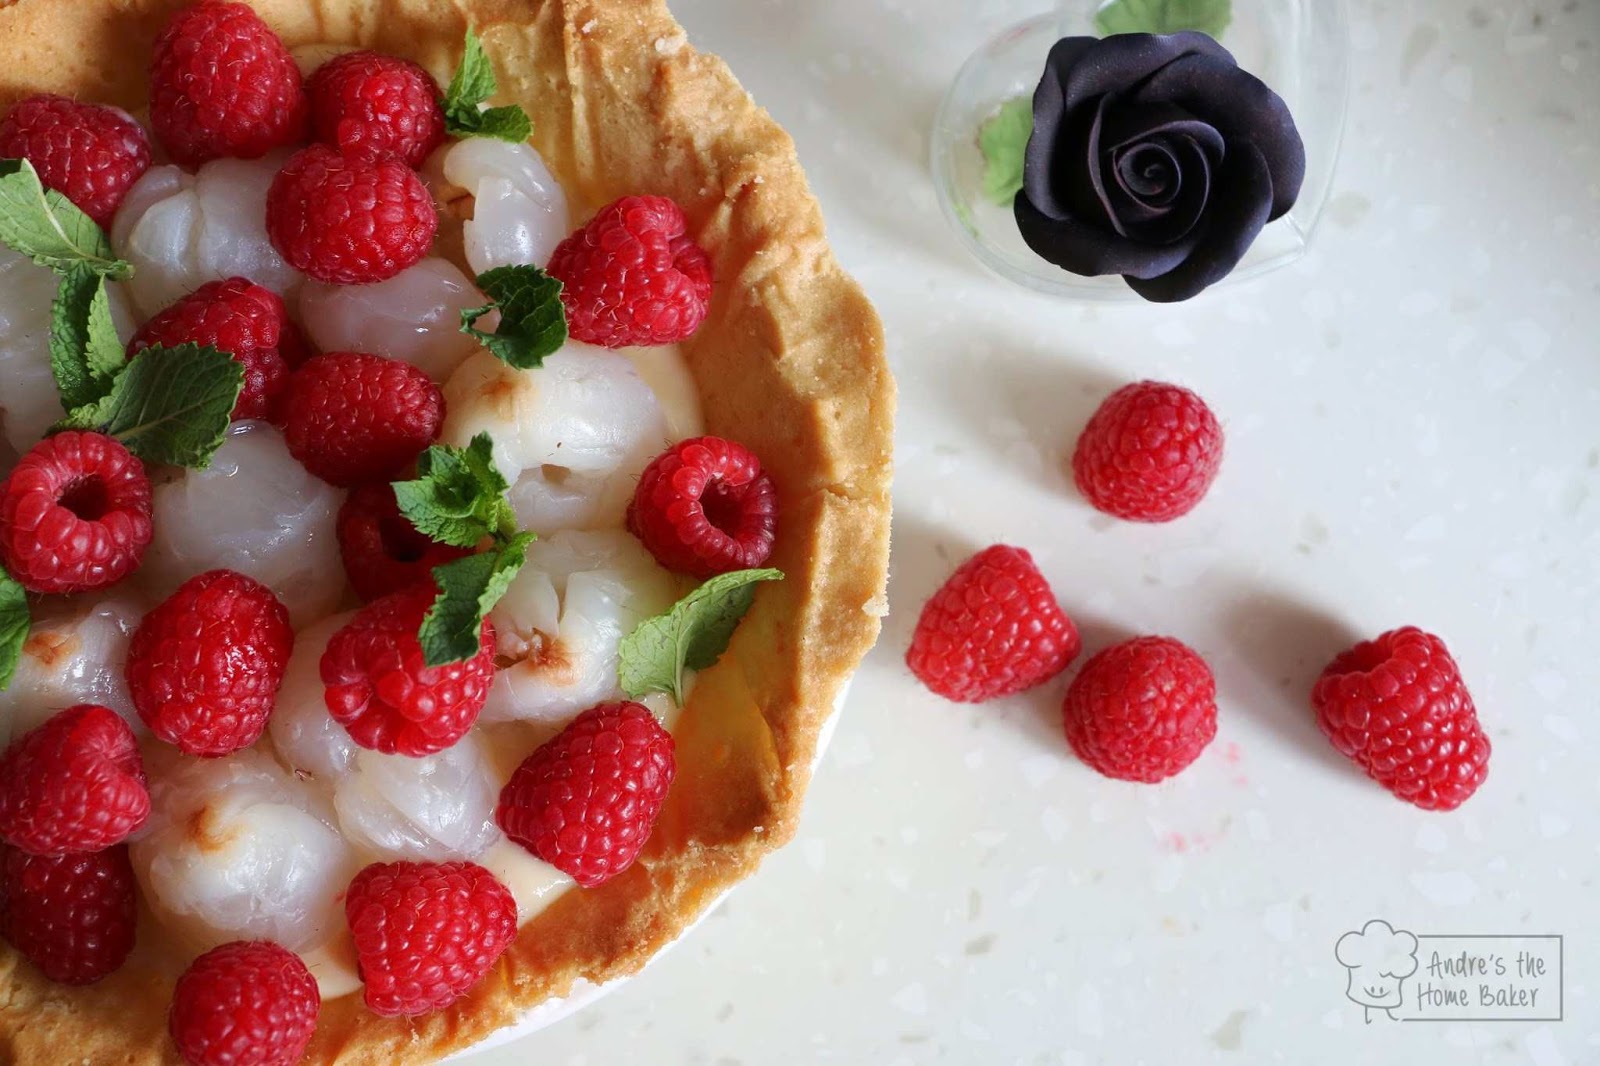
I always find a huge affinity between lychee and raspberries. And though they are both not in season, I tried to put them into a fruit tart.


True to its name, the pretty rough cookie crust has a lot of imperfections but it tastes so buttery and delicious. Unlike what I have made previously for my French apple tart, this is lying between a flaky and shortcrust. I do love this version more.


This recipe calls for fresh fruits. But in case you couldn't manage to find real fresh lychees, canned lychee are also great for substitution. Make sure to drain them very well as no one would want a soggy tart!
This post is part of the weekly linky party I'm Lovin' It hosted by Cheryl at TidyMom.

You'll need:
For the crust
1 3/4 cup all purpose flour
1 cup powdered sugar
8 tbsp cold salted butter
1 egg

For the pastry cream
1/2 tbsp all purpose flour
1 tbsp cornstarch
1 egg
1 tbsp Natvia
1 tsp vanilla
2/3 cup whole milk

For the toppings
Fresh lychee, pitted
Fresh raspberries
Fresh mint, optional

How to make lychee raspberry fruit tart:
  1. To make the crust: In a bowl combine flour and powdered sugar. Cut butter cubes using a fork or pastry blender until dough resembles coarse meal. Beat egg and add it slowly, until dough comes together. You may not need all the liquid. Turn the dough onto a floured surface and roll into a disk. Wrap in plastic and refrigerate for 30 minutes.
  2. Preheat oven to 200C. Remove the dough onto a floured surface, roll into 8" circle and fit into tart pan. Blind bake for 15 minutes. And return to oven for another 15 minutes.
  3. Let the crust to cool completely before filling.
  4. To make pastry cream: In a medium bowl, mix  Natvia and egg. Sift in corn flour and flour into the egg mixture. Mix until a smooth paste formed.
  5. Meanwhile, heat milk in a saucepan. Remove from heat and slowly add to egg mixture, while constantly whisking the egg to prevent curdling.
  6. Strain mixture through a sieve and return into the saucepan. Over medium heat, bring mixture to boil and whisk mixture constantly until it starts to thicken.
  7. Immediately remove from heat and stir in vanilla.
  8. Pour into a clean bowl and cover with plastic wrap touching the surface of custard. Refrigerate until needed.
  9. To assemble the tart, spread pastry cream evenly into the pie crust. Arrange lychees and raspberries. Decorate with fresh mint. 
With all my love <3

Share:
Read More
, , , , , ,

♥ Matcha Shiratama Anmitsu ♥


Anmitsu is a popular summer dessert in Japan. They are basically a dessert cup with agar agar jelly, fresh fruits, mochi, anko and green tea ice cream. 


Among all the Japanese wagashi, matcha shiratama is my favourite especially when it is served with kuromitsu and shiratama dango, that are black sugar syrup and Japanese mochi respectively.


The recipe looks complicated, but in fact can be effortlessly made within an hour. This dessert is surely the best cooling agent for this summer!
Optionally, you may want to serve with vanilla ice cream too!
This post is part of the weekly linky party I'm Lovin' It hosted by Cheryl at TidyMom.

This post is part of the monthly link up party Our Growing Edge. This event aims to connect food bloggers and inspire us to try new things. This month is hosted by Maddie at Supper Lovin'.


Adapted from justonecookbook
You'll need:
For matcha kanten jelly (matcha jelly)
2 tsp Matcha powder
2 tbsp hot water
1 tsp agar agar powder or gelatin
1 1/4 cup water
2 tbsp Natvia

For shiratama dango (mochi)
1/3 cup glutinous rice flour or shiratamako
3 tbsp water
1/2 tsp Natvia

For kuromitsu (black sugar syrup)
100g black sugar
100g Natvia
100 ml water

For toppings
Sweet adzuki bean (red bean) paste
Your favourite fresh fruits
Vanilla or green tea ice cream

How to make matcha shiratama anmitsu:
  1. To make matcha jelly, mix matcha powder with hot water and set aside. In a saucepan over medium heat, heat agar agar, water and Natvia until melt. Remove from heat and add the matcha mixture. Pour the jelly mixture in a 8 x 8 square pan and cool to set completely in the fridge.
  2. To make mochi, combine glutinous rice flour, water and Natvia. Knead with your head to form a ball. Adjust by adding one tablespoon of water at a time. Form the dough into a log and divide into 6 equal pieces. Shape and flatten them into discs. Make an indentation in the center with your index finger. Cook them in boiling water about 2 minutes or until they float to the surface. Transfer them to cold water to cool and keep them in water until ready to use.
  3. To make black sugar syrup, mix all ingredients in a saucepan and bring to boil. Simmer for 15-20 minutes and stir occasionally until slightly thicken. Allow to cool and transfer to airtight bottle until ready to use.
  4.  To assemble, cut matcha jelly into cubes and divide evenly among serving bowls. Top with mochi, red bean paste, fresh fruits and a scoop of ice cream. Serve aside black sugar syrup. Enjoy!
With all my love <3

Share:
Read More