Showing posts with label mochi. Show all posts
, , , , , ,

♥ Sweet Potato Mochi Cake ♥


During the Chinese New Year, our family would make sweet potato soup with tang yuan (glutinous dumplings), sweet Teochew kueh with mungbean filling, coconut pudding and turnip cake. So what left behind are some sweet potato and mushy mung bean. 


I decide to use these ingredients and make a Chinese treat similar to my popular steamed pumpkin mochi. Instead, these are pan-fried and drizzled with osmanthus honey.


This Chinese treat is perfect in any occasion. And I assume healthy too because all the sweetness is coming from the sweet potatoes. You may adjust by adding more sugar, or I would suggest serving with honey syrup.

This post is linked to Cook and Celebrate: Chinese New Year 2016 organised by Yen from GoodyFoodies Diana from Domestic Goddess Wannabe and Zoe from Bake for Happy Kids.

This post is part of the monthly link up party Our Growing Edge. This event aims to connect food bloggers and inspire us to try new things. This month is hosted by Chinelo at Good Cake Day.


This post is part of the weekly linky party I'm Lovin' It hosted by Cheryl at TidyMom.


This post is linked to the event, Little Thumbs up organised by Doreen from my little favourite DIY and Zoe from Bake for Happy Kids, hosted by Jess from Bakericious at this post.

You'll need:
3 medium size sweet potatoes
3 heaping tbsp glutinous rice flour
1 tbsp Natvia
1/2 cup mung bean filling
A little water, optional
Vegetable oil, for frying

How to make sweet potato mochi cake:
  1. Steam sweet potato over medium-high heat until soft. Discard the water and peel off the skin.
  2. In a large bowl, mash sweet potato with Natvia to sweeten. Add glutinous rice flour and knead into a dough. Add water if needed.
  3. Divide the dough into equal portion, around 5. Flatten each and spoon mung bean filling. Seal tightly and roll into flatten disc shape.
  4. Heat oil in a non-stick frying pan. Place cakes spacing apart from each other. Cook over medium-high heat until lightly golden brown and cooked through.
  5. Serve hot with osmanthus honey.
With all my love <3

Share:
Read More
, , , ,

♥ Black Sesame Dumpling (Tang Yuan) ♥


Tang Yuan, aka glutinous rice dumpling, is a popular Chinese sweet during the Chinese New Year festival. It symbolizes togetherness and completeness of the family, which is also similarly served during the Mid Autumn Festival.


Nowadays, these dumplings often come in a variety of fillings such as red bean, peanut, egg custard or even green tea and purple sweet potato, but the most loved and common choices is black sesame filling.


When serve, it is delicious to go with a hot sweet soup. Hope this recipe can bring you sweet memories and loads of happiness.
*Adjust the sugar accordingly to see how sweet you want the filling to be. I used 2:1 ratio.

This post is linked to Cook and Celebrate: Chinese New Year 2016 organised by Yen from GoodyFoodies Diana from Domestic Goddess Wannabe and Zoe from Bake for Happy Kids.

This post is part of the monthly link up party Our Growing Edge. This event aims to connect food bloggers and inspire us to try new things. This month is hosted by Chinelo at Good Cake Day.

This post is part of the weekly linky party I'm Lovin' It hosted by Cheryl at TidyMom.

You'll need:
2 tbsp black sesame powder
1 tbsp black sugar*
2 tsp natural peanut butter, such as this
1 tsp vegetable oil, to smoothen
50g glutinous rice flour
1/4 tsp wheat starch
5 tbsp water
To serve:
Water
Cane sugar

How to make black sesame dumpling (Tang Yuan):
  1. To make black sesame filling: In a bowl, combine black sesame powder, black sugar, peanut butter and vegetable, mix well until smooth.
  2. Divide equal parts and roll into balls. Cover with cling film and set aside.
  3. To make the glutinous rice dough: In a large bowl, mix glutinous rice flour, wheat starch and water. Keep kneading until the dough comes together into a small ball. Shape into a log.
  4. Take 1 heaping portion of the dough, flatten and wrap around 1 teaspoon sesame filling. Seal the edge and shape the balls gently.
  5. Bring a pot of water to boil and add cane sugar. When it melts and water comes to boil again, add the rice dumplings and cook for 5-6 minutes, or until they float to the surface.
  6. Serve hot.
With all my love <3

Share:
Read More
, , , , ,

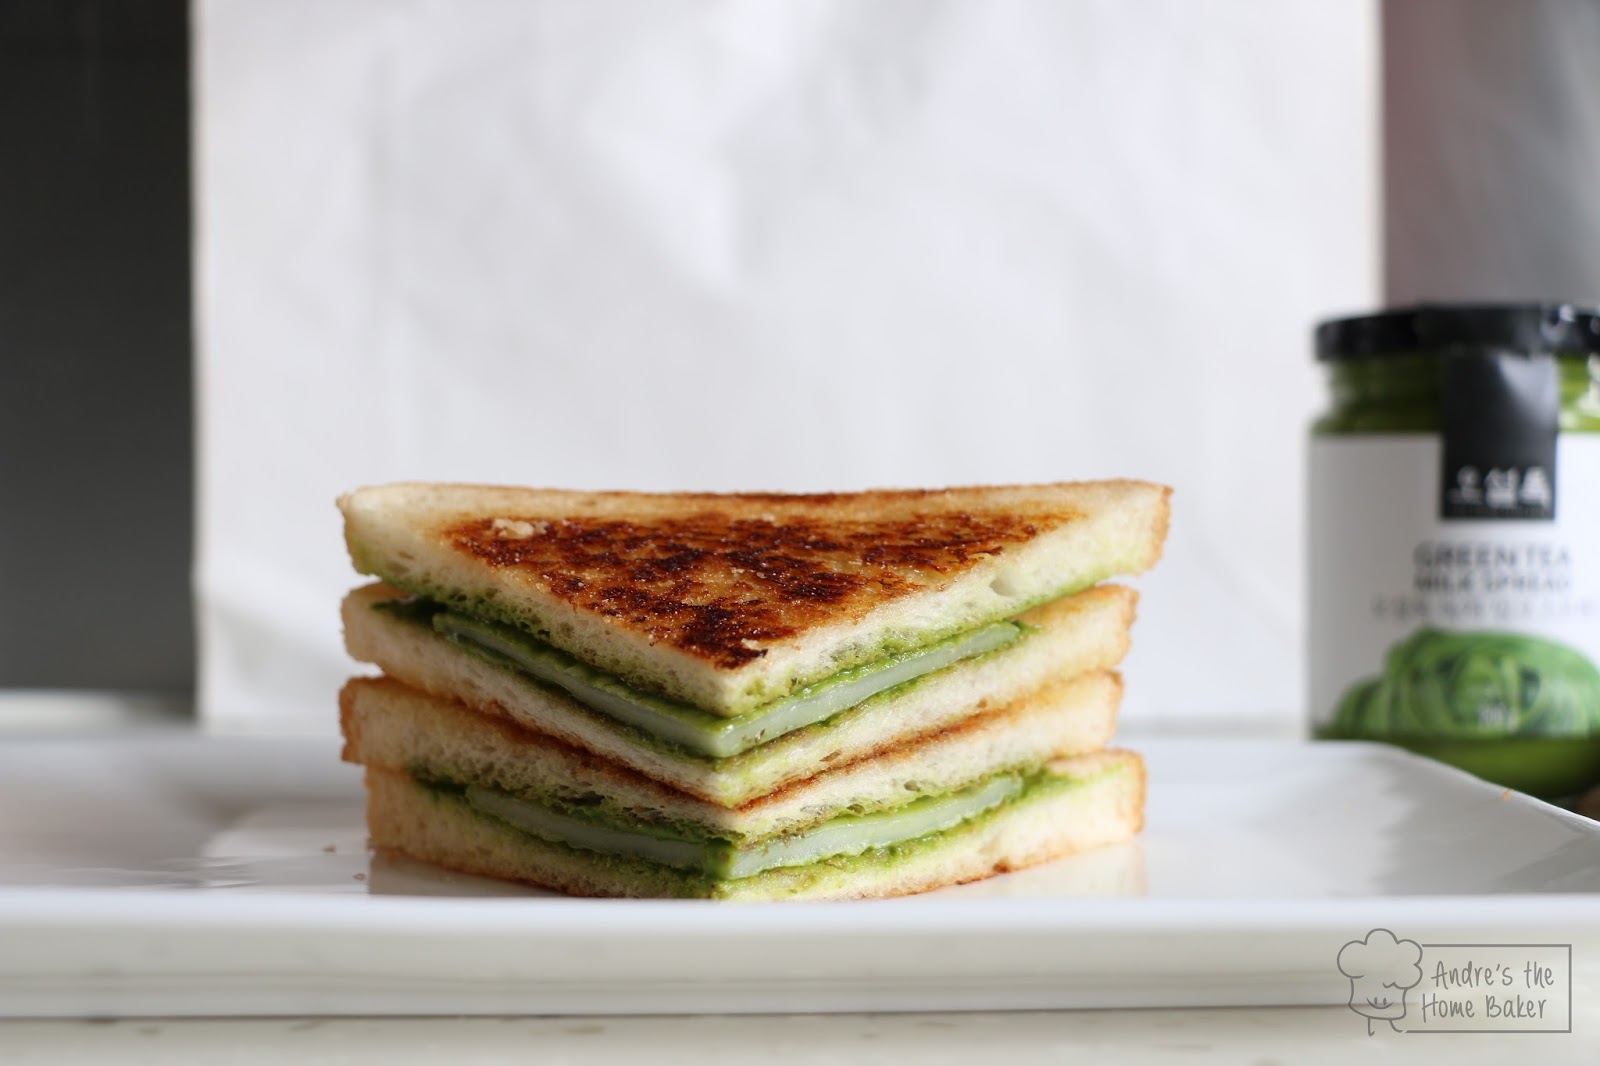
♥ Matcha Honey Mochi Toastie ♥


Have you heard of a Korean dessert - mochi toast? It is basically two slices of toast stuffed with chewy rice cake, and finished with some additional toppings.


For my version, plus a little adaptation from Miss Hangrypants, I have combined my recent favouite souvenirs during the trip to Seoul - OSULLOC green tea milk jam, and a honey butter toasted bread to from this amazing goodness.


I bought these creations to our picnic day, and all my friends loved them.


For the rice cake, I have actually used glutinous rice flour to revamp the texture of rice cake. So it is best to eat fresh as it will turn hard the other day.

This post is part of the weekly linky party I'm Lovin' It hosted by Cheryl at TidyMom.
This post is part of the monthly link up party Our Growing Edge. This event aims to connect food bloggers and inspire us to try new things. This month is hosted by Jess at Little Girl Story.


Adapted from Miss Hangrypants
Serve 1
You'll need:
2 slices of milk bread
2 tbsp salted butter, melted
2 tbsp honey
1/4 cup glutinous rice flour
1 tsp Natvia, optional
3 tbsp hot water
Green Tea Milk Spread

How to make matcha milk jam honey mochi toast:
  1. In a small bowl, combine glutinous rice flour, Natvia, and hot water. Stir until a smooth dough form. Form a ball and roll into the size of your slice of bread.
  2. Heat frying pan over low heat. Grease light with vegetable oil and fry mochi for 2-3 minutes on each side.
  3. Meanwhile, brush each slice of bread with melted butter. Toast slightly and apply honey. Toast until golden brown.
  4. Spread green tea milk jam onto toast, place mochi and complete with another toast. Serve immediately!
With all my love <3

Share:
Read More
, , ,

♥ Mini Cheese Mochi Bread ♥


Mochi bread (麻波波糬), is a no-flour type of bread, made with glutinous rice and tapioca starch, which give them a chewy bouncy texture.


There are a lot of version, some flavored with cheese, chocolate, green tea and some stuffed with dried berries and fruits.


My favourite is definitely the cheese mochi bread.


Any type of grated cheese can be used instead of parmesan. To get the best quality and taste for these mochi breads, I used a block of parmigiano reggiano and finely grated them.

This post is linked to Cook and Celebrate: Christmas 2015 organised by Yen from GoodyFoodies Diana from Domestic Goddess Wannabe and Zoe from Bake for Happy Kids.
This post is part of the monthly link up party Our Growing Edge. This event aims to connect food bloggers and inspire us to try new things. This month is hosted by Jazz at Dash of Jazz.

Adapted from beanpanda
You'll need:
110g glutinous rice flour
15g tapioca starch
30g grated parmesan cheese
1/2 tsp salt
1 egg
35g melted butter
60ml whole milk

How to make mochi bread:
  1. Preheat oven to 170C. Line a baking sheet with parchment paper.
  2. In a medium bowl, sift together glutinous rice flour and tapioca starch. Combine with grated cheese and salt. Set aside.
  3. In a mixing bowl, whisk egg, melted butter and milk. Gently fold in flour mixture using a spatula.
  4. Divide into equal pieces, shape into rounds and place on prepared baking sheet spacing each apart.
  5.  Bake in 160C for 20 minutes, or until puffed up and golden brown. Let sit on wire rack to cool completely.
With all my love <3

Share:
Read More
, , , ,

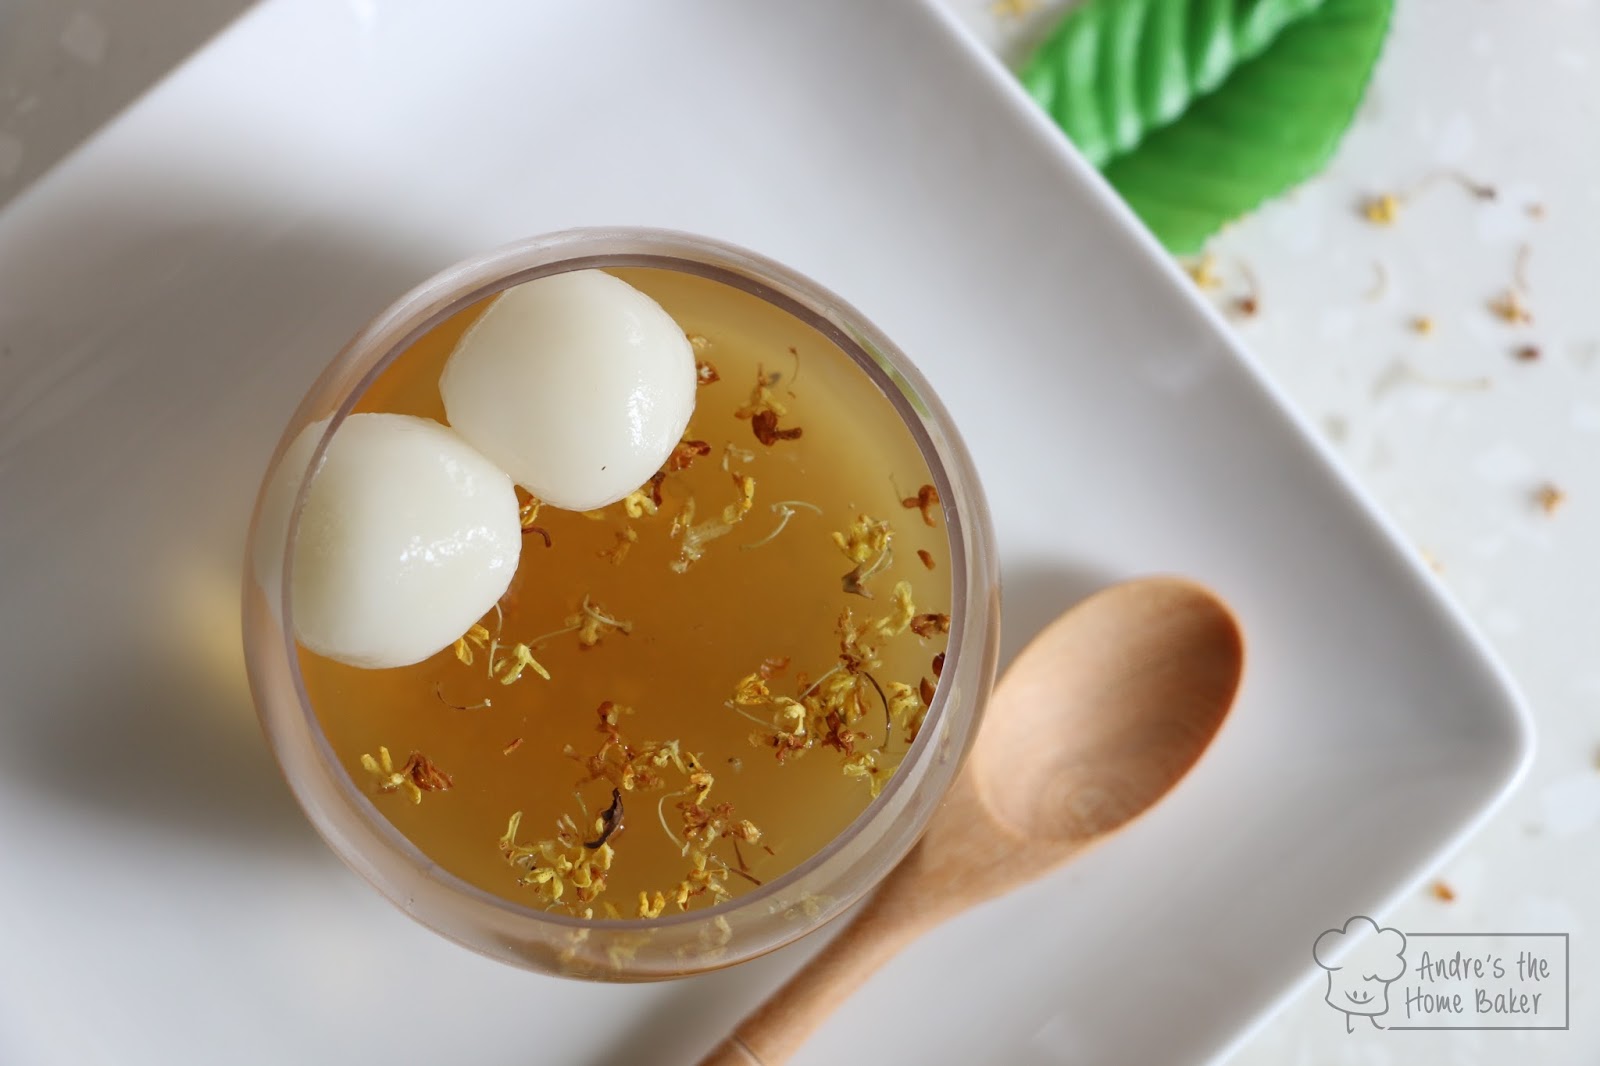
♥ Sweet Potato Soup Jelly Cup ♥


Sweet Potato Sweet Soup, 蕃薯糖水, is a Chinese classic winter dessert. It is popularly known with a sweet ginger soup base, cooked sweet potatoes and some people like to add Tongyuan.


I have the idea to make this hot soup into a cold dessert, which is equally delicious and much more refreshing! See the bottom layer? It is a layer of sweet potato puree. 


I also sprinkle some dried osmanthus on the top sweet soup layer to give extra aroma.
Additionally, two mini rice balls are the resemblance of Tangyuan. They are optional.

This post is linked to Cook and Celebrate: Christmas 2015 organised by Yen from GoodyFoodies Diana from Domestic Goddess Wannabe and Zoe from Bake for Happy Kids.
This post is part of the monthly link up party Our Growing Edge. This event aims to connect food bloggers and inspire us to try new things. This month is hosted by Jazz at Dash of Jazz.

Serve 6
You'll need:
For jelly:
100g sweet potatoes
5g agar agar strip, soaked in water
750ml water
30g Natvia
30g cane sugar
Dried osmanthus

For glutinous rice balls:
1/3 cup glutinous rice flour
3 tbsp water

How to make sweet potato dessert soup jelly:
  1. Peel and cut sweet potatoes. Steam for 20 minutes and mash into puree. Set aside.
  2. In a saucepan, boil water and agar until completely melted. Add Natvia and cane sugar to dissolve.
  3. Take 1/3 of agar liquid and combine with sweet potato puree. Whisk to smooth and divide evenly among dessert cup. Let cool at room temperature and set in the fridge for 5 minutes.
  4. Add osmanthus into remaining agar liquid. Divide evenly into dessert cup, over the sweet potato layer. Place in the fridge to set.
  5. Meanwhile, mix glutinous rice flour with water until a smooth dough form. Divide into small equal portion and roll into mini balls.
  6. Cook over medium boil water until they float to the surface. Immediately transfer to ice cold water.
  7. When serve, place two glutinous rice balls on jelly surface. Store remaining in the fridge.
With all my love <3
Share:
Read More
, , ,

♥ Steamed Pumpkin Mochi ♥


When pumpkins are in season, their sweetness are absolutely perfect for making desserts.
Did I mention I made pumpkins out of pumpkins?


These mini pumpkin rice cakes are a great dim sum treat in Shanghai cuisine.
So delicate, chewy and soft; filled with red bean paste and steamed in bamboo steamer.


You may choose not to put any filling, and will basically taste similar to tong yuen (glutinous rice dumpling).
I also used a handful of goji berries to replace raisins for the top.
Likewise, please adjust the sugar content depending on the sweetness of the pumpkin your using.
Mine is a Japanese pumpkin, so adding a little natural sweetener is so good already.

This post is linked to Cook and Celebrate: Christmas 2015 organised by Yen from GoodyFoodies Diana from Domestic Goddess Wannabe and Zoe from Bake for Happy Kids.

This post is part of the weekly linky party I'm Lovin' It hosted by Cheryl at TidyMom.
This post is part of the monthly link up party Our Growing Edge. This event aims to connect food bloggers and inspire us to try new things. This month is hosted by Jazz at Dash of Jazz.

Adapted from beanpanda
Make 16
You'll need:
150g pumpkin
70g glutinous rice flour
20g wheat starch
1 tsp Natvia
3 tbsp water, or more
16 goji berries
Red bean paste for filling, optional

How to make mini pumpkin mochi:
  1. Ready a bamboo steamer. Chop pumpkin into big chunks and place on steaming plate. Steam for 15-20 minutes or until soft.
  2. Scape out the flesh to remove the skin, mash thoroughly with a fork or potato masher. Let it set aside to cool slightly.
  3. Meanwhile, prepare parchment papers with the size of 5 x 5 cm.
  4. In a large bowl, combine glutinous rice flour, wheat starch and Natvia. Add pumpkin puree and knead until the mixture is crumbly.
  5. Slowly add in water, 1 tbsp at a time. Knead until a smooth dough form. If the dough it too dry, add a little more water. Roll the dough into a log and divide into equal portions.
  6. Take a portion, flatten slightly and place 1 teaspoon of red bean paste in the middle. Wrap and shape into an oval ball. Repeat with the rest of the ingredients.
  7. Using the back of a butter knife, mark 6 indentations and insert a goji berry on top of each ball to from mini pumpkin.
  8. Arrange them on parchment paper and place in a bamboo steamer, leaving space in between.
  9. Steam over high heat for about 8 minutes. Remove from heat and let cool completely.
  10. To store, refrigerate for 2-3 days. Re-steam before serving.
With all my love <3

Share:
Read More
, , ,

♥ Warabimochi ♥


Do you know about warabimochi? Originated from Japan, it is one of the popular Japanese wagashi widely known by everybody especially in Kansai.
It has a jelly texture made with bracken starch, commonly served with a generous coating of Kinako, aka roasted soybean powder, or sometimes matcha powder.


Additionally, some may prefer dipping with black sugar syrup for a better sweetness.
It is my favourite Japanese confection.


For this recipe, I used a warabimochiko, warabimochi flour, which is found at large Japanese grocery store. Using raw sugar is what I usually have on hand, but may be substituted with granulated sugar, brown sugar or even your healthy sweetener such as Natvia.

This post is linked to Cook and Celebrate: Christmas 2015 organised by Yen from GoodyFoodies Diana from Domestic Goddess Wannabe and Zoe from Bake for Happy Kids.


You'll need:
50g warabimochiko
50g raw sugar
250ml water
Roasted soybean flour (Kinako)

How to make Japanese warabimochi:
  1. To prepare baking tray, sprinkle generously with soybean flour until evenly and well covered
  2. In a bowl combine warabimochiko, raw sugar and water. Whisk until mixture is smooth with no lumps.
  3. Place over medium heat. Stir constantly and in one direction until the mixtures heat, thicken and elastic.
  4. When it turns translucent. Remove from heat quickly and pour onto prepared tray. Sprinkle the top with more kinako.
  5. Press gently to flatten and cut into pieces. Cool completely before serving.
With all my love <3

Share:
Read More