Showing posts with label Japanese. Show all posts
, , , , , ,

♥ Honey Toast Box ♥


Sometimes called the brick toast, honey toast box is a dessert originated from Taiwan, which is found commonly at Taiwanese cafe and also Japanese cafe.


They are usually composed of thick cut toast with spread of butter and honey, top with sweet ornaments such as ice cream, whipped cream, fruits or even chocolate sticks.


Let's make a healthy homemade version. I have use salted butter and honey, because I like the sweet and salt combination; fresh strawberries and blueberries, but feel free to use blackberries; and completes with a scoop of delicious cookies & cream ice cream.

This post is linked to Cook and Celebrate: Chinese New Year 2016 organised by Yen from GoodyFoodies Diana from Domestic Goddess Wannabe and Zoe from Bake for Happy Kids.

This post is part of the monthly link up party Our Growing Edge. This event aims to connect food bloggers and inspire us to try new things. This month is hosted by Chinelo at Good Cake Day.

This post is part of the weekly linky party I'm Lovin' It hosted by Cheryl at TidyMom.

Serve 4
You'll need:
4 slices of thick cut toast
1/4 cup salted butter, melted
1/4 cup honey
Berries of your choice
1 scoop of your favourite ice cream
Sweetened condensed milk, to serve

How to make honey toast box:
  1. Preheat oven to 180C. Line a baking sheet with aluminum foil. Set aside.
  2. Leave one slice of bread whole. Slice off the middle of the rest of the bread to get a total of 3 squares, leaving about 1/4 inch around the edges. Cut them into bread cubes.
  3. Melt butter in microwave. Brush the crusts and bread cube deliberately with melted butter and honey. Place them on prepared baking sheet and bake for 20 minutes, or until crisp and golden brown.
  4. Meanwhile, rinse and drain the berries.
  5.  To assemble, transfer the uncut toast on the bottom. Place the crust on top following one another. Fill the inside with mini bread cubes and top with ice cream, decorate with berries and drizzle with sweetened condensed milk.
With all my love <3

Share:
Read More
, , , ,

♥ Matcha Tart ♥


Other than Hong Kong egg tart and the extremely popular cheese tart brought by the Japanese, matcha tart is another recently favourite in my country.


The tart has a buttery shortcrust pastry filled with a milk based egg custard, which is slightly different from the usual egg tarts using evaporated milk.
This helps to prevent the matcha flavor being overpowered by the sweet milk.


In this recipe, I have made a slight adjustment to my basic pate sucree recipe, instead added powdered sugar to give a better flakiness.
And thanks Ann for sharing such a delicate matcha sweet treat.

This post is linked to Cook and Celebrate: Chinese New Year 2016 organised by Yen from GoodyFoodies Diana from Domestic Goddess Wannabe and Zoe from Bake for Happy Kids.

This post is part of the monthly link up party Our Growing Edge. This event aims to connect food bloggers and inspire us to try new things. This month is hosted by Chinelo at Good Cake Day.

Adapted from Anncoo Journal
You'll need:
For the pate sucree
1 1/4 cup all purpose flour
3 tbsp powdered sugar
1/2 cup (1 stick) cold salted butter
1 egg yolk
1 tbsp cold milk

For the filling
200g whole milk
30g raw sugar
2 tsp matcha powder, sifted
1 egg
1 egg yolk

How to make matcha egg tart:
  1. To make the pate sucree: In a bowl combine flour and powdered sugar. Cut butter cubes using a fork or pastry blender until dough resembles coarse crumbs. Beat egg yolk and water. Slowly add to the flour mixture until a dough comes together. You may not need all the liquid. Turn the dough onto a floured surface and roll into a disk. Wrap in plastic and refrigerate for at least 30 minutes. This pate sucree dough can be stored in the freezer for 2 months.
  2. Preheat oven to 180C. Remove the dough onto a floured surface, divide and roll into balls. Press and fit into the tart tins. Prink holes on the bottom using a fork.
  3. Bake in oven for 10 minutes. Set aside.
  4. To make the filling: Heat milk and sugar until the sugar melt. Add sifted matcha powder and whisk until well blended.
  5. In another bowl, whisk together egg and egg yolk. Add egg mixture into the matcha milk and whisk to combine.
  6. Pour liquid over a fine sieve to remove any lumps. Divide the matcha mixture among pre-baked tarts and bake for another 20 minutes, or until egg is set.
With all my love <3

Share:
Read More
, , , ,

♥ Strawberry Matcha Pound Cake Shortcake ♥


I always think matcha or green tea and strawberry is a seamless blend of dessert art.
The colour tone catches the eye and the taste of combination is deliciously notable.


This strawberry shortcake has the ordinary butter biscuit replaced by a matcha pound cake recipe. This twist is actually inspired by my Matcha Strawberry Mini Bundt Cake, which also uses Natvia as the natural sweetener.


I like how the slight bitterness from Natvia has been covered by the pronounce matcha flavor, whilst it is pretty crucial to use good quality matcha powder like this. So make sure you're not using green tea granules! 

This post is linked to Cook and Celebrate: Chinese New Year 2016 organised by Yen from GoodyFoodies Diana from Domestic Goddess Wannabe and Zoe from Bake for Happy Kids.

This blog hop is organised by Joyce from Kitchen Flavours, Lena, from Frozen wings and Zoe from Bake for Happy Kids.

This post is part of the weekly linky party I'm Lovin' It hosted by Cheryl at TidyMom.

This post is part of the monthly link up party Our Growing Edge. This event aims to connect food bloggers and inspire us to try new things. This month is hosted by Jess at Little Girl Story.

You'll need:
For matcha pound cake
1/2 cup butter, soften
2/3 cup Natvia
2 eggs
1 tsp vanilla
1 tbsp whole milk
1 cup all purpose flour
1 tbsp matcha powder

For toppings
1 1/2 cup whipping cream
1 tsp vanilla
Fresh strawberries, halved

How to make matcha green tea pound cake:
  1. Preheat oven to 180C. Grease a loaf pan and set aside.
  2. In a mixing bowl, combine butter and Natvia. Cream until smooth.
  3. Add egg, one at a time, and beat until well incoprated. Add vanilla.
  4. In a small bowl, sift together flour and matcha powder. Add the dry into the wet ingredients and mix well.
  5. Pour batter into prepared loaf tin. Bake for 40-45 minutes or until set and edges slightly turned brown.
  6. Meanwhile, add vanilla into cold whipping cream and beat until soft peak formed.
  7. Serve one to two slices of matcha pound cake with a dollop of vanilla whipped cream and fresh strawberries.
With all my love <3

Share:
Read More
, , , , ,

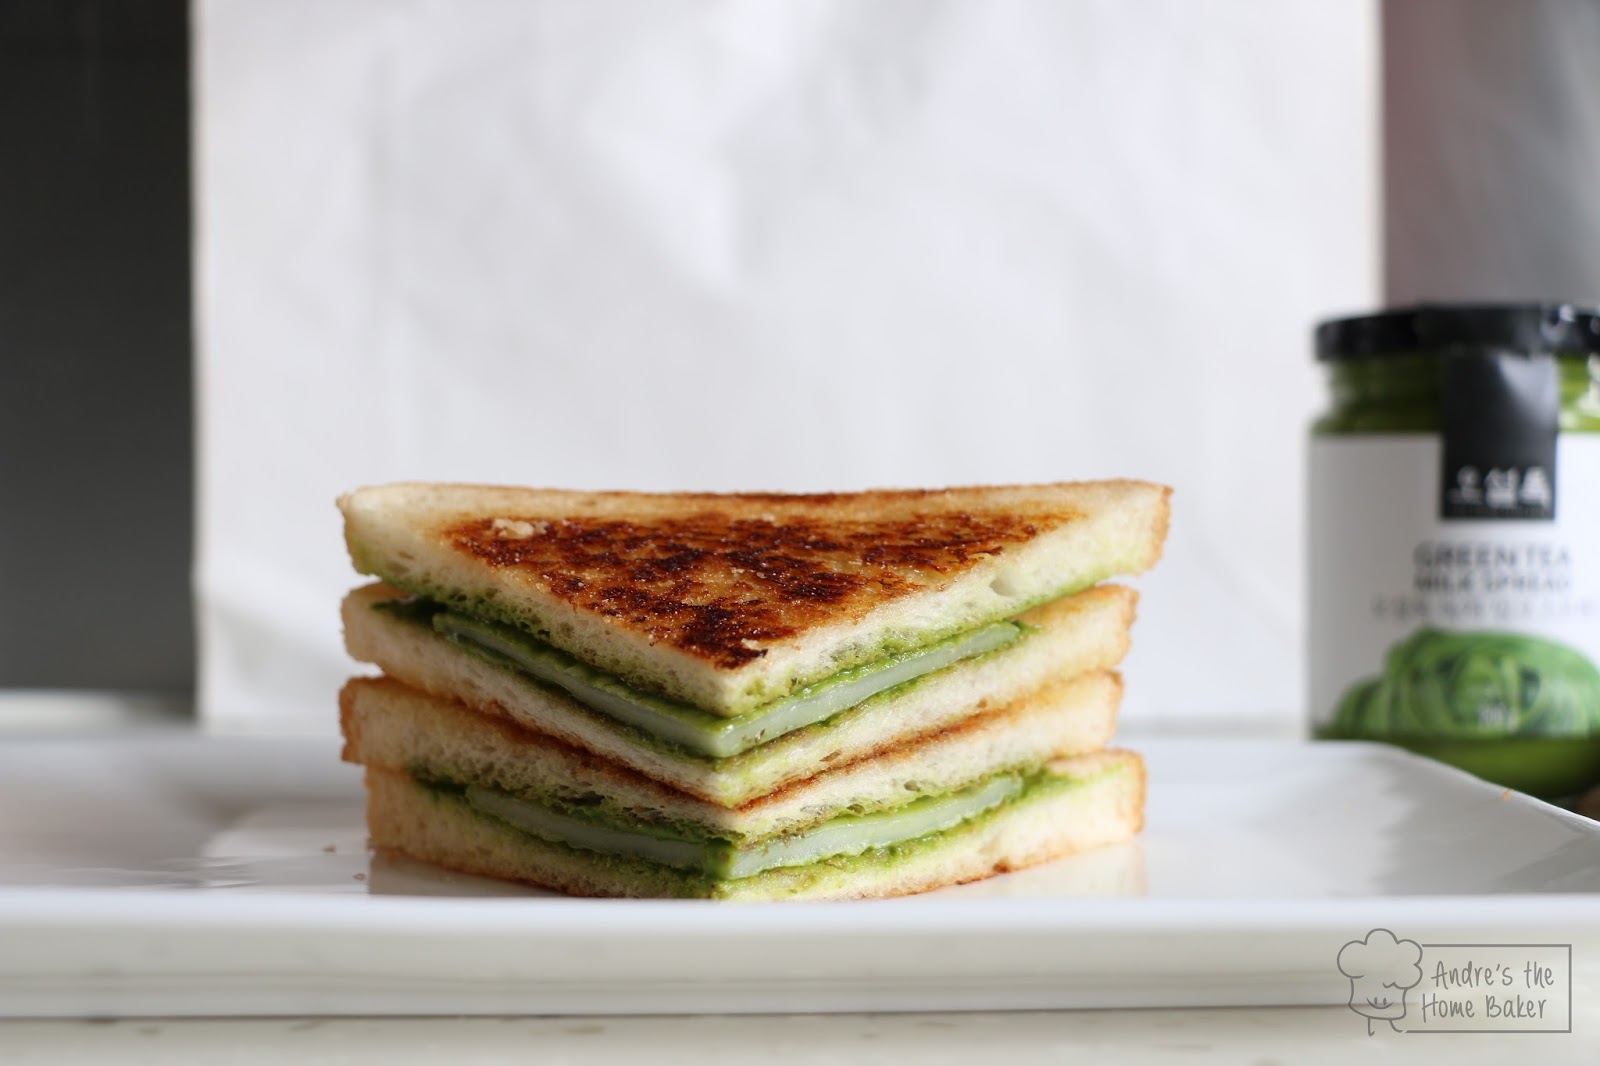
♥ Matcha Honey Mochi Toastie ♥


Have you heard of a Korean dessert - mochi toast? It is basically two slices of toast stuffed with chewy rice cake, and finished with some additional toppings.


For my version, plus a little adaptation from Miss Hangrypants, I have combined my recent favouite souvenirs during the trip to Seoul - OSULLOC green tea milk jam, and a honey butter toasted bread to from this amazing goodness.


I bought these creations to our picnic day, and all my friends loved them.


For the rice cake, I have actually used glutinous rice flour to revamp the texture of rice cake. So it is best to eat fresh as it will turn hard the other day.

This post is part of the weekly linky party I'm Lovin' It hosted by Cheryl at TidyMom.
This post is part of the monthly link up party Our Growing Edge. This event aims to connect food bloggers and inspire us to try new things. This month is hosted by Jess at Little Girl Story.


Adapted from Miss Hangrypants
Serve 1
You'll need:
2 slices of milk bread
2 tbsp salted butter, melted
2 tbsp honey
1/4 cup glutinous rice flour
1 tsp Natvia, optional
3 tbsp hot water
Green Tea Milk Spread

How to make matcha milk jam honey mochi toast:
  1. In a small bowl, combine glutinous rice flour, Natvia, and hot water. Stir until a smooth dough form. Form a ball and roll into the size of your slice of bread.
  2. Heat frying pan over low heat. Grease light with vegetable oil and fry mochi for 2-3 minutes on each side.
  3. Meanwhile, brush each slice of bread with melted butter. Toast slightly and apply honey. Toast until golden brown.
  4. Spread green tea milk jam onto toast, place mochi and complete with another toast. Serve immediately!
With all my love <3

Share:
Read More
, , ,

♥ Tamago Musubi Sushi ♥


Aside form ahi poke, musubi is also one of the signature Hawaiian food.
It is essentially like regular sushi made with spam, and comparatively in bigger size.


My interpretation on musubi has been a twist with my favourite Japanese egg omelette - tamagoyaki.


Traditionally, the egg omelette is made in layers and layers of dashi-egg mixture, I simplify the ingredients with handy salt and natural sweetener, plus a cornstarch mixture for stability.

This post is linked to Cook and Celebrate: Christmas 2015 organised by Yen from GoodyFoodies Diana from Domestic Goddess Wannabe and Zoe from Bake for Happy Kids.

This post is part of the weekly linky party I'm Lovin' It hosted by Cheryl at TidyMom.
This post is part of the monthly link up party Our Growing Edge. This event aims to connect food bloggers and inspire us to try new things. This month is hosted by Jazz at Dash of Jazz.

You'll need:
For tamagoyaki, egg omelette:
2 eggs
1 tbsp water
2 tbsp Natvia
2 tbsp salt
1 tsp cornstarch + 1 tbsp water

For spam:
1 small can spam, sliced
1 tbsp soy sauce
1 tbsp Natvia

For Musubi sushi:
1 cup Japanese rice, cooked
Nori, cut into strips
Japanese mayonnaise

How to make tamago musubi sushi:
  1. To prepare tamagoyaki, combine eggs, water, Natvia and salt in a bowl. Whisk lightly with chopsticks. Add cornstarch mixture and mix well. Set aside.
  2. Place a tamagoyaki frying pan over medium heat. With a kitchen paper dipped in oil, grease the pan and add a thin layer of egg mixture. Tilt the pan to cover the bottom.
  3. Poke any air bubbles formed. After the bottom is set, roll into a log from one side to another.
  4. Move omelette on one side, apply oil and pour egg mixture to cover the bottom. Lift the omelette to let it spread underneath.
  5. When the bottom is set, roll again from one side to another. Repeat with remaining egg mixture.
  6. Place the tamagoyaki on bamboo mat lined with plastic film. Shape the egg and let cool for 5 minutes. Slice into equal pieces.
  7. Meanwhile, to prepare spam, mix together soy sauce and Natvia.
  8. Place spam on frying pan. Heat over medium heat until edges turn golden brown. Flip to cook the other side.
  9. When both side turns brown, add the soy sugar mixture and coat the spam evenly from top to bottom. The sauce will turn sticky.
  10. Once ready, remove from saucepan and let cool slightly.
  11. To assemble musubi, shape one heaping spoon of steamed rice into rectangular shape. Add a dollop of mayonnaise and place a slice of spam.
  12. Add another dollop of mayonnaise over the spam and place a slice of tamagoyaki.
  13. Wrap the thin strip of nori over to form sushi. Serve immediately.
With all my love <3

Share:
Read More
, , ,

♥ Warabimochi ♥


Do you know about warabimochi? Originated from Japan, it is one of the popular Japanese wagashi widely known by everybody especially in Kansai.
It has a jelly texture made with bracken starch, commonly served with a generous coating of Kinako, aka roasted soybean powder, or sometimes matcha powder.


Additionally, some may prefer dipping with black sugar syrup for a better sweetness.
It is my favourite Japanese confection.


For this recipe, I used a warabimochiko, warabimochi flour, which is found at large Japanese grocery store. Using raw sugar is what I usually have on hand, but may be substituted with granulated sugar, brown sugar or even your healthy sweetener such as Natvia.

This post is linked to Cook and Celebrate: Christmas 2015 organised by Yen from GoodyFoodies Diana from Domestic Goddess Wannabe and Zoe from Bake for Happy Kids.


You'll need:
50g warabimochiko
50g raw sugar
250ml water
Roasted soybean flour (Kinako)

How to make Japanese warabimochi:
  1. To prepare baking tray, sprinkle generously with soybean flour until evenly and well covered
  2. In a bowl combine warabimochiko, raw sugar and water. Whisk until mixture is smooth with no lumps.
  3. Place over medium heat. Stir constantly and in one direction until the mixtures heat, thicken and elastic.
  4. When it turns translucent. Remove from heat quickly and pour onto prepared tray. Sprinkle the top with more kinako.
  5. Press gently to flatten and cut into pieces. Cool completely before serving.
With all my love <3

Share:
Read More
, , , ,

♥ Matcha Mille Crepe ♥


Crepe is a thin French pancake.
The French often serve them with sweet fillings such as fruits, custard and cream; or sometimes savoury versions known as galette, with egg, cheese and ham.


Whilst Mille Crepe is composed of numerous layers of crepe being stacked together with custard or cream in different flavors. It is a very popular patisserie in New York, particularly from the brand Lady M!


Can you see those 18 layers of crepe! Stunning!


This recipe is super easy to whip up in fact. Treat it as a completely lump free pancake batter. Toasty, moist and set together with a matcha flavored custard.  I also topped this individual serving crepe cake with some whipped cream for a creamy contrast!

This post is also linked to the event, Little Thumbs up organised by Doreen from my little favourite DIY and Zoe from Bake for Happy Kids, hosted by Grace from Life can be simple at this post.

This post is part of the weekly linky party I'm Lovin' It hosted by Cheryl at TidyMom.


Make 4 2" mini cakes
Adapted from OH HOW CIVILIZED
You'll need:
For the crepes
1 cup all purpose flour
1 tbsp Natvia
1/4 tsp salt
2 egg, beaten
2 cup whole milk
4 tbsp vegetable oil, more for frying

For the matcha pastry cream
1 pastry cream recipe
1 tbsp matcha powder
1 tbsp hot water
1 tbsp Natvia
1 tsp Honey (from Honey 蜜蜜針)

For topping
1/2 cup heavy cream
Powdered sugar
Matcha powder

How to make crepe:
  1. In a large bowl, whisk together flour, Natvia and salt. Add milk, beaten egg, vegetable oil and whisk until smooth, with no lumps.
  2. Dab a paper towel with vegetable oil and grease a nonstick skillet. Ladle a serving of crepe batter and swirl to cover the bottom of the pan completely. Let it cook until dry and edges begin to turn brown. Quickly flip over and cook for 30 seconds.
  3. Transfer the crepe to a plate to cool. Repeat with the rest of the batter.
How to make matcha pastry cream:
  1. Prepare pastry cream and keep in the fridge until ready to use. 
  2. In a bowl, mix together matcha powder and hot water. Add in Natvia and honey. Mix well.
  3. Remove pastry cream from the fridge and combine with matcha mixture.
How to assemble and make matcha crepe cake:
  1. Using a 2" cookie cutter, cut out circles from crepes. Place a mini crepe in 2" cake tin, spread a teaspoon of matcha pastry cream and cover with another crepe. Repeat the layers, leaving the top layer without cream. 
  2. Place in the fridge to chill. When serve, dollop whipped cream and dust generously with matcha powder and powdered sugar.
With all my love <3

Share:
Read More